A garden fence does more than mark boundaries – it sets the mood, frames your plants, and can even become the star of your outdoor space. To build any custom fence design, you generally need three things: a clear plan, basic tools, and the right materials. Most DIY fences follow the same process: measure your area, set strong posts, attach your panels or decorative elements, then seal or paint to protect from weather.

Common tools include a measuring tape, spirit level, post digger or shovel, drill, screws or nails, sandpaper, paintbrushes, and safety gear like gloves and goggles. Basic materials can range from wooden boards and metal rods to recycled items like bottles or tiles, depending on your idea. Once you understand this framework, you can turn almost anything into a creative garden fence.
Below are 10 fresh, unique garden fence ideas with what you need and how to make each one, followed by ready-to-use image prompts at the end.
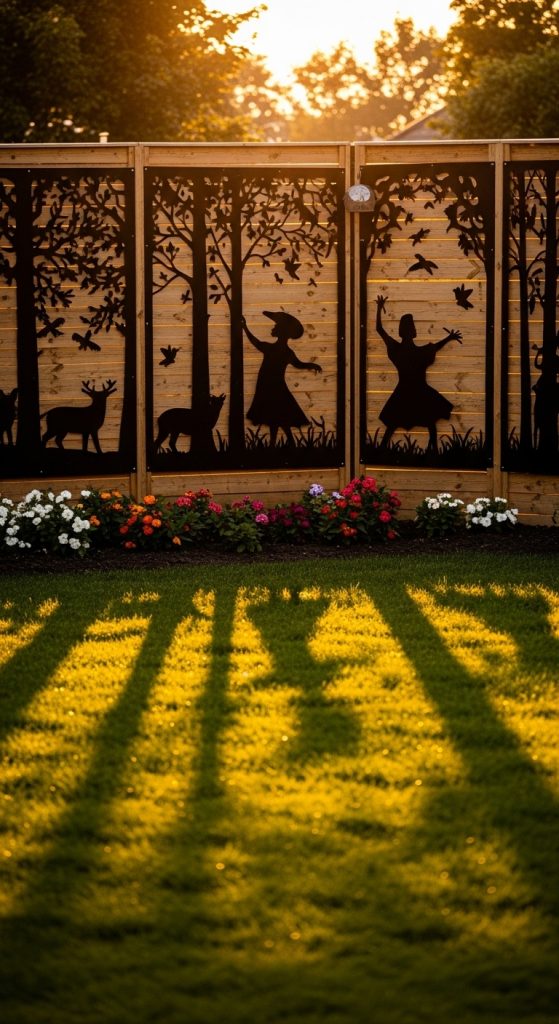
1. Shadow-Silhouette Story Fence
Turn your fence into a storytelling wall that casts magical shadows at sunset.
What you need
- Plain wooden or metal fence panels
- Thin plywood or metal sheets (for silhouettes)
- Marker or printed silhouettes (animals, plants, people, fairy-tale scenes)
- Jigsaw or metal cutter
- Sandpaper
- Exterior black paint
- Screws or strong outdoor adhesive
- Drill and screwdriver
How to make
- Sketch or print silhouettes of your chosen theme (forest animals, dancing figures, garden fairies) onto paper and trace them onto thin plywood or metal sheets.
- Carefully cut out the shapes using a jigsaw or suitable cutter. Smooth edges with sandpaper.
- Paint each cut-out with exterior black paint to create bold shadow shapes. Let them dry completely.
- Decide where the sun usually sets and how it hits your fence. Position silhouettes so they will cast distinct shadows onto the ground or plants in the late afternoon.
- Attach the silhouettes to the fence with screws or strong outdoor adhesive, leaving slight gaps between them to create a layered story scene.
- Add a clear sealant if needed for extra weather protection.
- Enjoy the daily “shadow show” as the sun moves and your fence tells a different story at each hour.
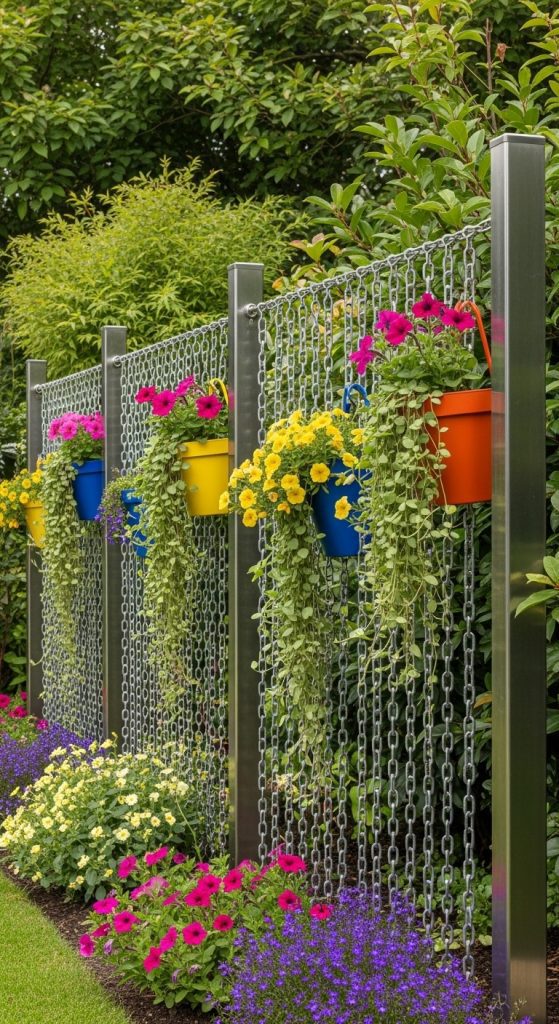
2. Suspended Planter-Chain Fence
A light, airy fence made from vertical chains holding colorful planters instead of solid boards.
What you need
- Galvanized steel poles or sturdy wooden posts
- Heavy-duty galvanized chains (cut to fence height)
- S-hooks or carabiners
- Lightweight metal or plastic planters with handles or drilled holes
- Potting soil and plants (trailing vines, herbs, small flowers)
- Concrete mix (for anchoring posts)
- Drill and hardware to fix chains to posts
How to make
- Mark your fence line and install sturdy posts at regular intervals. Set them in concrete and allow to cure.
- Measure the desired fence height and cut chains accordingly.
- Attach the top of each chain to the top rail or the top of each post using bolts, hooks, or welded loops. Make sure chains hang straight.
- Prepare your planters by adding drainage holes if needed. Attach S-hooks or small chains to their handles.
- Hang planters at staggered heights along each vertical chain so they overlap slightly, creating a semi-solid “green” wall.
- Fill planters with soil and plants. Choose hardy, sun-appropriate species.
- Step back and adjust spacing so the fence looks uniform yet organic. Over time, the plants will fill in, making the fence feel lush and alive.
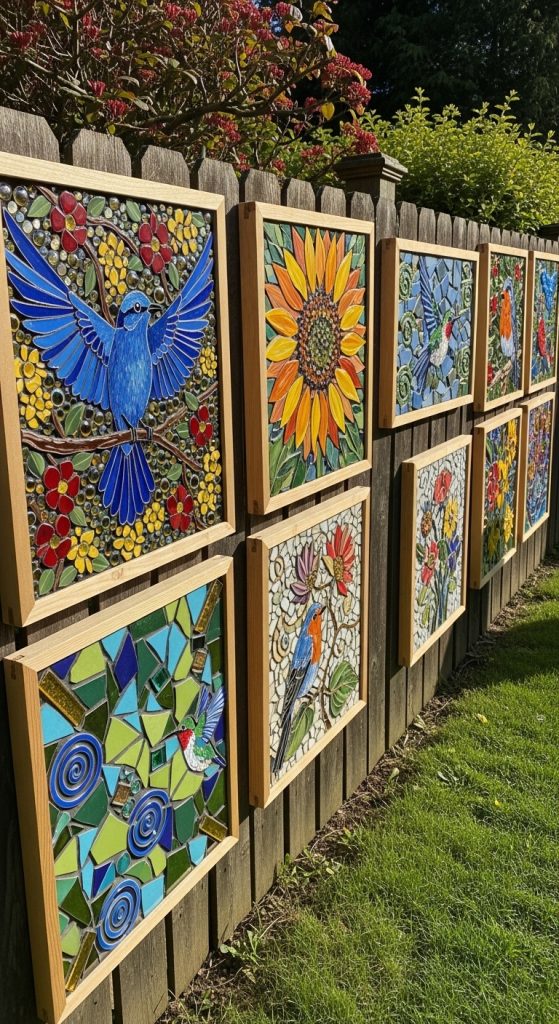
3. Mosaic Storyboard Fence (Tile & Shard Art)
A colorful fence covered in mosaic “frames” that tell different mini-stories along the boundary.
What you need
- Sturdy wooden or concrete fence panels
- Broken ceramic tiles, old plates, glass beads, mirror shards
- Exterior tile adhesive
- Grout (outdoor grade)
- Trowel and grout float
- Sponges and bucket of water
- Painter’s tape or wood strips (to outline mosaic “frames”)
- Safety gloves and eye protection
How to make
- Decide on several rectangular or square “frames” along your fence. Mark their borders with painter’s tape or temporary wooden strips.
- Sort your tiles and shards by color and texture. Plan loose designs: flowers, abstract waves, birds, or geometric patterns.
- Spread exterior tile adhesive inside one frame using a trowel.
- Press tiles and shards into the adhesive, leaving small gaps for grout. Build your design like a puzzle.
- Let adhesive cure according to instructions, then apply grout over the whole framed section, pushing it between pieces with a grout float.
- Wipe off excess grout with a damp sponge, rinsing frequently. Allow to dry and then lightly polish the surface.
- Repeat for each frame, creating a storyboard of scenes along your garden. Seal with exterior sealer if recommended.
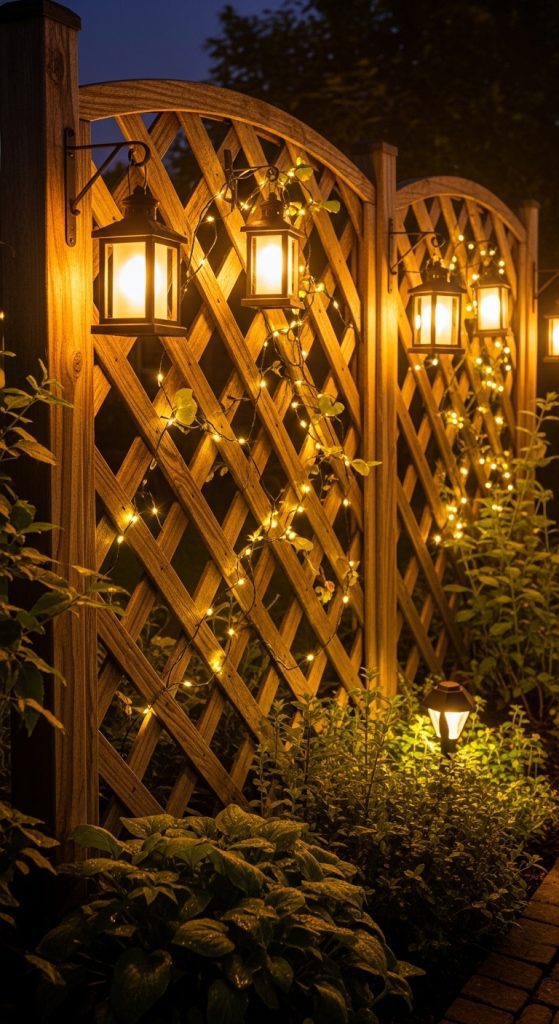
4. Lantern-Lattice Night Fence
A fence that looks like a simple lattice by day but transforms into a glowing lantern wall after dark.
What you need
- Wooden lattice panels or crisscrossed wooden slats
- Fence posts and concrete mix
- Solar-powered fairy lights or LED lanterns
- Hooks or zip ties
- Exterior wood stain or paint
- Clear outdoor sealant
How to make
- Install fence posts and attach lattice panels securely, ensuring they are stable and evenly spaced.
- Stain or paint the lattice in a color that complements your garden, then seal for weather protection.
- Weave solar fairy lights through the back of the lattice, keeping the solar panel tops exposed to sunlight. Alternatively, hang small LED lanterns at intersections using hooks or zip ties.
- Hide or neatly arrange wires on the back side of the fence for a clean front view.
- Add a few decorative elements (small hanging pots, metal leaves, or wooden shapes) on the front side for daytime interest.
- At night, the lattice glows softly, outlining the crisscross pattern like a wall of tiny lanterns.
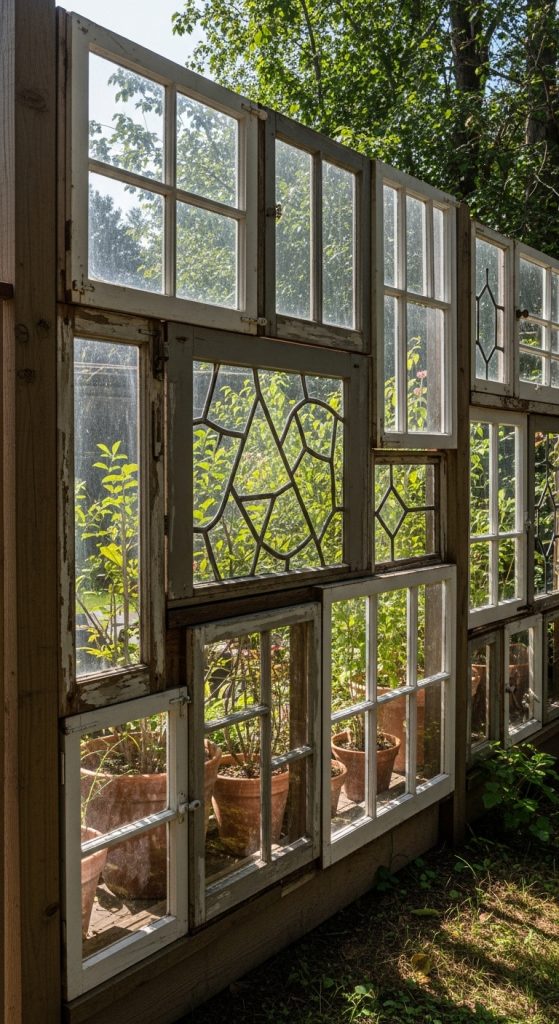
5. Reclaimed Window Greenhouse Fence
Create a fence made from old windows that doubles as a mini greenhouse wall for tender plants.
What you need
- Old wooden or metal-framed windows (with intact glass, various sizes)
- Strong wooden posts and horizontal rails
- Hinges and latches (for some windows to open)
- Screws, drill, brackets
- Sandpaper and paint or sealant
- Weatherstripping (optional, for tighter closures)
How to make
- Collect and clean old windows. Lightly sand wooden frames and repaint or seal to protect from weather.
- Set sturdy fence posts and horizontal rails to form a frame that can hold your windows like puzzle pieces.
- Arrange windows on the ground first to find a layout you like, mixing sizes for a patchwork effect.
- Attach the bottom row of windows to the rails using screws and brackets. Work upward, aligning edges as best as possible.
- Choose a few windows to be “vent” panels. Attach these with hinges and add small latches so you can open them for air circulation.
- Add optional weatherstripping around movable windows if you plan to shelter delicate plants directly behind the fence.
- Plant shade-loving or tender plants on the inside of the fence to benefit from the extra warmth and wind protection.
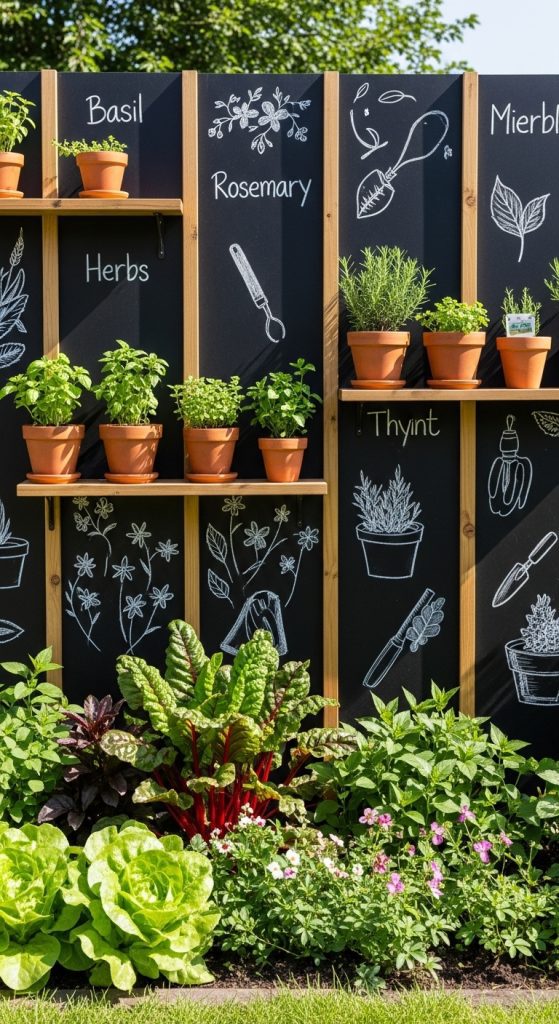
6. Vertical Chalkboard Herb-Fence
A fence that works as a chalkboard menu and vertical herb garden in one.
What you need
- Plain wooden fence panels or plywood sheets attached to posts
- Exterior-grade chalkboard paint
- Paint rollers and brushes
- Narrow wooden shelves or metal brackets
- Small metal or terracotta pots
- Screws and wall plugs (if needed)
- Chalk or liquid chalk markers
- Herbs and potting soil
How to make
- Sand the fence surface lightly and clean off dust.
- Apply 2–3 coats of exterior chalkboard paint, allowing each coat to dry fully.
- Once dry, “season” the chalkboard by rubbing chalk all over and then wiping off with a dry cloth.
- Attach narrow shelves or brackets along the lower half of the fence. Make sure they are level and securely screwed in.
- Place small pots with herbs (basil, mint, thyme, chives) on the shelves, or hang them from hooks above.
- Use chalk to label each herb, write garden notes, weekly menus, or seasonal messages across the upper half of the fence.
- Repaint with chalkboard paint when the surface gets worn and refresh your designs.
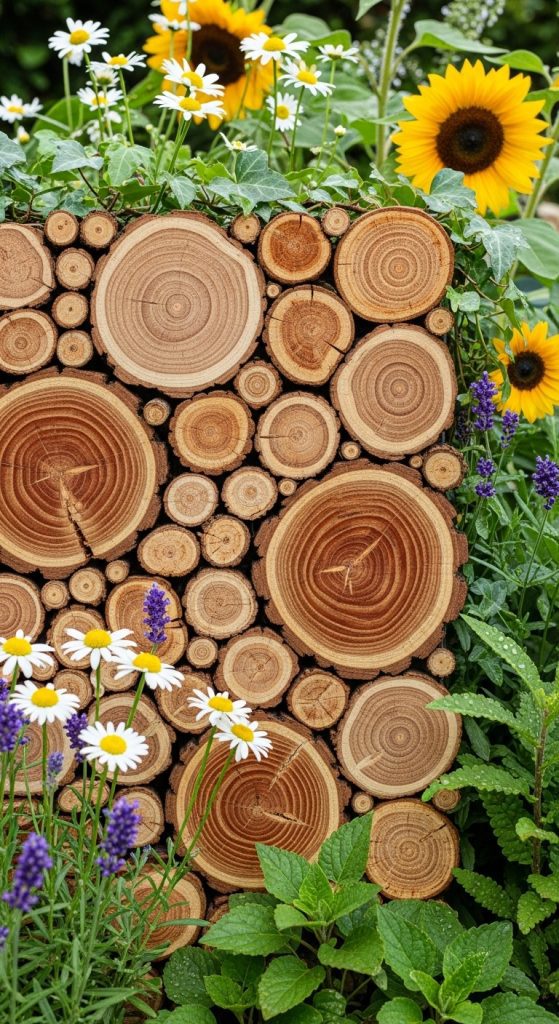
7. Rustic Log-Slice Patchwork Fence
A warm, textural fence built from cross-sections of tree branches and small logs.
What you need
- Thick plywood or OSB sheets as backing (outdoor grade)
- Assorted branches and small logs (dry, various diameters)
- Chainsaw or handsaw to cut slices
- Exterior wood glue and screws
- Sandpaper
- Clear exterior wood sealant or varnish
- Fence posts and mounting hardware
How to make
- Cut branches and small logs into round slices of varying thicknesses (around 2–5 cm). Let them dry completely if freshly cut.
- Lightly sand one side of each slice to help them adhere well to the backing.
- Fix the plywood or OSB sheets to fence posts to create a solid, vertical backing wall.
- Lay out your log slices on the ground to plan a patchwork pattern, mixing sizes for a natural, organic look.
- Starting from the bottom corner of the backing, glue and screw each slice in place, keeping gaps small but visible for rustic texture.
- Continue until the entire panel is covered with log slices.
- Once everything is dry, apply a clear exterior sealant or varnish to protect the wood and highlight the beautiful rings.
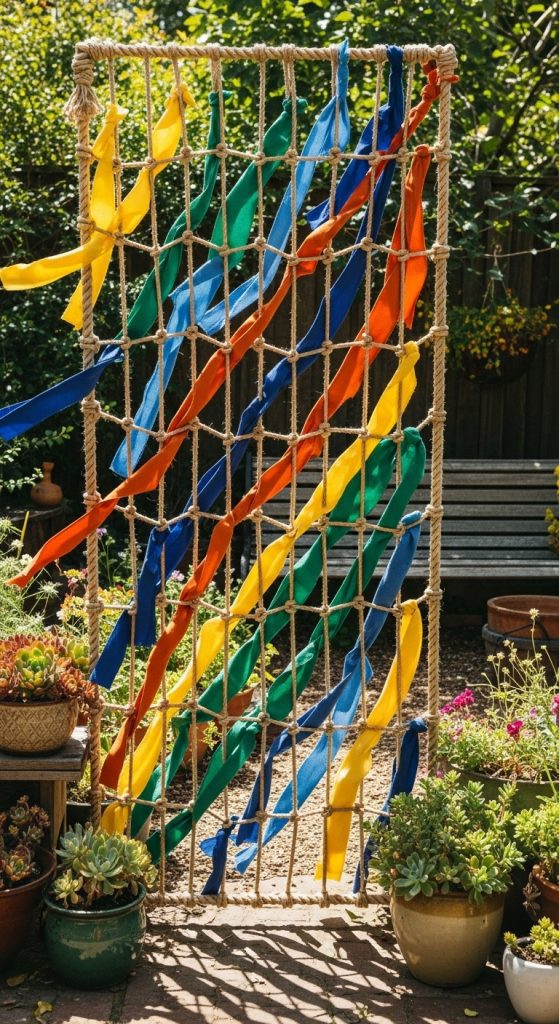
8. Woven Fabric & Rope Breeze Fence
A semi-transparent fence made from woven outdoor fabric and rope panels that flutter gently in the breeze.
What you need
- Sturdy wooden or metal frame (top and bottom rails, posts)
- Thick outdoor rope (natural or synthetic)
- Outdoor fabric strips (canvas, shade cloth, or recycled fabric, cut into long ribbons)
- Staple gun or strong cable ties
- Scissors
- Weatherproofing spray for fabrics (optional)
How to make
- Build a rectangular frame between fence posts, with a top and bottom rail to anchor your weaving.
- Attach vertical rope strands from top to bottom rail, spaced evenly to form a simple loom. Secure tightly with knots, staples, or cable ties.
- Cut outdoor fabric into long strips (5–15 cm wide).
- Start weaving fabric strips horizontally in and out of the vertical ropes, alternating “over–under” like a basket. Push each strip down snugly and secure its ends to the outer ropes or frame.
- Mix colors and materials to create patterns, gradients, or stripes.
- For extra durability, spray the finished fabric fence with weatherproofing spray.
- The result is a soft, artistic barrier that moves with the wind and filters light beautifully.
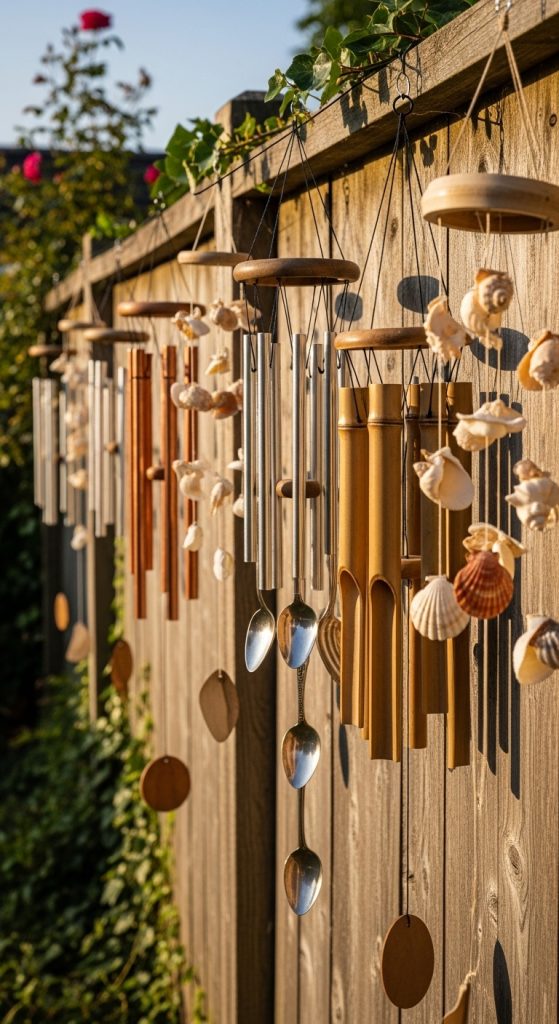
9. Musical Wind-Chime Sound Fence
A fence that sings softly when the wind blows, using recycled metal and wood chimes.
What you need
- Existing fence or simple horizontal rail fence
- Assorted metal pipes, old cutlery, small bells, bamboo pieces, wooden chimes
- Strong fishing line, nylon cord, or thin chain
- Small hooks or screw eyes
- Drill (for making holes in chimes)
- Exterior varnish (for wooden chimes)
How to make
- Collect items that make pleasant sounds when clinked together: copper or aluminum pipes, old spoons, keys, bamboo, shells with holes, etc.
- Drill small holes where needed so each piece can be suspended.
- Install a top rail or horizontal beam along the inside of your fence if one is not already present.
- Screw in small hooks or screw eyes at regular intervals along the rail.
- Hang your chimes in short clusters using cord or chain. Mix materials so each cluster has a different tone and texture.
- Seal any wooden pieces with exterior varnish to prevent rot.
- Position louder chimes away from bedroom windows and quieter ones closer to seating areas for a relaxing soundscape.
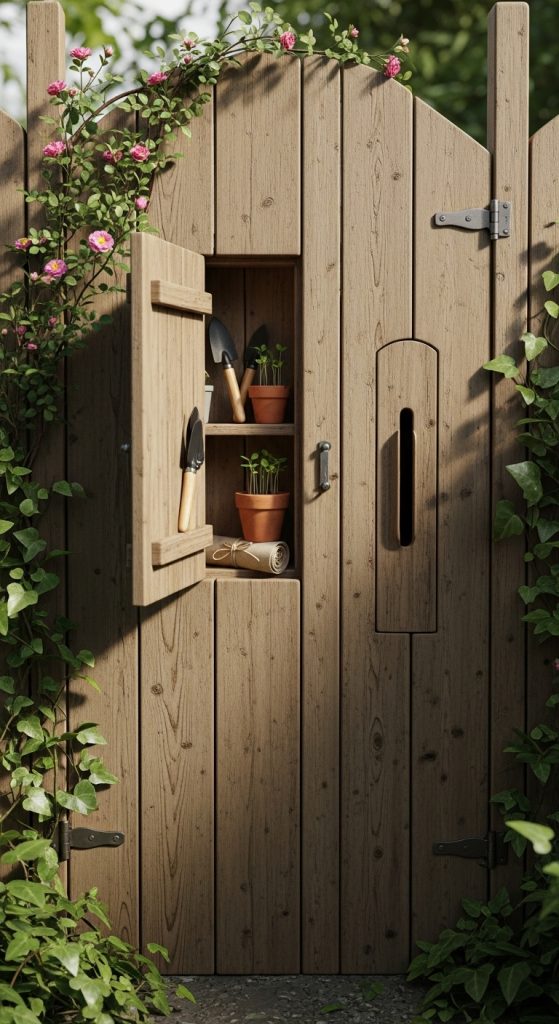
10. Hidden Door Secret-Niche Fence
A practical fence with built-in “secret” compartments and a hidden mini door for tools or treasures.
What you need
- Standard wooden fence panels
- Extra boards to create shallow box compartments
- Small hinges and magnetic catches
- Latch hardware
- Saw, drill, screws
- Paint or stain
- Hooks and small shelves (for inside the niches)
How to make
- Choose sections of your fence where you want hidden storage niches or a small secret door.
- Cut a rectangular opening in the panel and build a shallow box that fits snugly inside, open toward the garden. Attach the box to the back of the fence.
- Use the cut-out piece as the “door” front, or create a new front to match the rest of the fence. Attach it with hinges on one side.
- Install magnetic catches or a simple latch inside the niche, so it closes flush and almost invisible from the outside.
- Add small hooks, shelves, or containers inside the niche for tools, seeds, kids’ toys, or small decor items.
- For a larger hidden door (kid-sized), frame a narrow panel as a functional gate but disguise it with continuous planks or climbing plants.
- Paint or stain the entire fence uniformly so the secret compartments blend perfectly.